- Published on
[NeoX Tutorial] Deploy an ERC-20 Smart Contract on NeoX with Hardhat
- Authors

- Name
- NeoDashboard
- @DashboardNeo
First what is an ERC-20 token? ERC-20 is the technical standard behind smart contracts serving for implementation of tokens on the Ethereum blockchain.
If you want to deploy your own ERC-20 token on NeoX blockchain or understand how It works this guide is for you.
If you follow the previous tutorials about deploying on Hello World Smart Contract or verifying a Smart Contract you just need to go in the same folder you use for It.
If you want to skip this part you can just pull this repository containing the work.
In those cases you can directly go to Step 5 and skip first ones. Otherwise let's see how to setup this project from scratch.
Step 1: Get you NeoX private key on Metamask
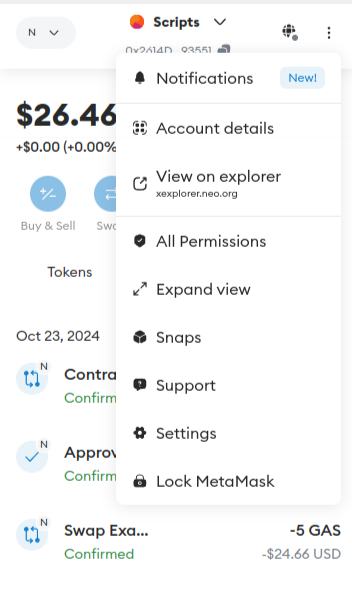
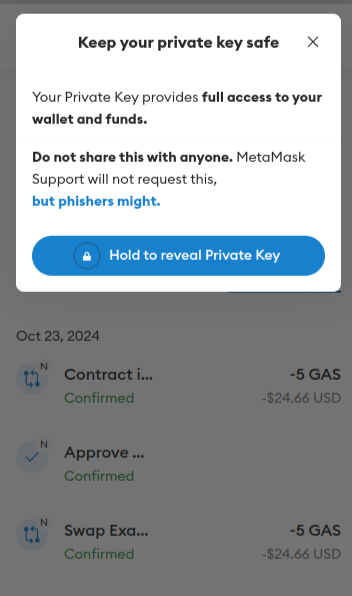
First we will need a private key to interact with NeoX testnet chain. If you are using Metamask It's really simple just do as follow.
Account details on our Metamask wallet. 
Hold to reveal Private Key. 
Step 2: Use faucet to get some testnet tokens
You have 2 options to get some NeoX testnet tokens:
- You can claim It on the NeoX faucet website
- Or you can join NeoX Discord server and go to the
#dev-resourceschannel to interact with the faucet bot
You can then verify your balance by connectiong on NeoX testnet explorer
Step3: Initialize your project
First, we'll need to create a folder for our project. Navigate to your command line and input the following.
mkdir my-token
cd my-token
Now that you are inside your project folder, you will use npm init to initialize the project.
If you don’t have npm installed yet, follow these instructions to install Node.js and npm.
Now you are ready to initialize your project just type npm init and fill information. Here is what we choose for our test:
package name: (Token)
version: (1.0.0)
description: My ERC-20 contract
entry point: (index.js)
test command:
git repository:
keywords:
author: NeoDashboard
license: (ISC)
About to write to /home/crypto/neo/hardhat-tutorials/my-token/package.json:

{
  "name": "Token",
  "version": "1.0.0",
  "description": "My Neox ERC-20 contract",
  "main": "index.js",
  "scripts": {
    "test": "echo \"Error: no test specified\" && exit 1"
  },
  "author": "NeoDashboard",
  "license": "ISC"
}


Is this OK? (yes)
Step 4: Install Hardhat
We will use Hardhat to compile, deploy, test, and debug our Neox smart contract. To install It type this command npm install --save-dev hardhat inside your my-token project.
Once It's done we will create the Hardhat project by running this command npx hardhat (choose create an empty hardhat.config.js option for this tutorial).
This step will generate a hardhat.config.js file in the project. We'll use this later in the tutorial to specify the setup for our project.
Step 5: Complete project configuration
Every transaction sent from your wallet requires a signature using your unique private key (the one we retrieve in first step). To provide our program with this permission, we can safely store our private key in an environment file.
We will install the dotenv package in your project directory allowing to use environment variables from a .env file:
npm install dotenv --save
And then create our .env file with the private key variable named NEOX_PK. This file will look like this
PRIVATE_KEY = "your-metamask-private-key"
Now we will install the Hardhat recommended plugin
npm install --save-dev @nomicfoundation/hardhat-toolbox
And then change our hardhat.config.js with the one below:
require("dotenv").config();
require("@nomicfoundation/hardhat-toolbox");

const { NEOX_PK } = process.env;

module.exports = {
    solidity: {
      version: "0.8.26",
      settings: {
        optimizer: {
          enabled: true,
          runs: 200,
          details: {
            yul: false,
          },
        },
      }
    },
    networks: {
        'neox-t4': {
            url: 'https://neoxt4seed1.ngd.network',
            accounts: [`${NEOX_PK}`],
            gasPrice: 40e9,
            gas: 50e6,
        },
    },
    etherscan: {
        apiKey: {
            'neox-t4': 'empty'
        },
        customChains: [
            {
                network: 'neox-t4',
                chainId: 12227332,
                urls: {
                    apiURL: 'https://xt4scan.ngd.network/api',
                    browserURL: 'https://neoxt4scan.ngd.network'
                }
            }
        ]
    }
};
Step 6: Install OpenZeppelin
OpenZeppelin, which spearheads the advancement of the ERC20 standard, provides a comprehensive library for secure smart contract development which we will be using to implement our token. To do this, we need to first install the OpenZeppelin contracts package. This is the basis we will use to build our ERC-20 smartcontract.
To install OpenZeppelin It's simple just run this command:
npm install @openzeppelin/contracts
Step 7: Write your contract
The standard practice is to match the smart contract file name with that of your token. For our example let's say we will create a token named Token with the symbol TOK.
So we will add a file named Token.sol in the contracts folder.
OpenZeppelin already has everything to work with ERC-20 contracts so our code will be really simple and looks like this:
// contracts/FunToken.sol
// SPDX-License-Identifier: MIT
pragma solidity ^0.8.0;

import { ERC20 } from "@openzeppelin/contracts/token/ERC20/ERC20.sol";

contract Token is ERC20 {

    // Define the supply of Token: 100,000,000
    uint256 constant initialSupply = 100000000 * (10**18);

    // Constructor will be called on contract creation
    constructor() ERC20("Token", "TOK") {
        _mint(msg.sender, initialSupply);
    }
}
By doing this we are creating a token names Token with then symbol TOK and will receive 100M token on the address used for deploying the contract. This is done by the _mint command in the constructor.
You can see on the line defining initialSupply that we are keeping the default number of decimals (18). If you want to change this to create a token with only 11 decimals for example juste change It by (10**11) and add this part to your code:
function decimals() public view override returns (uint8) {
  return 11;
}
Step 8: Compile your contract
This step is super simple once your environment is ready you just have to run this command:
npx hardhat compile
If you followed all the tutorials you should see something like this
Compiled 6 Solidity files successfully (evm target: paris).
The number can change if you add some other files or removed some.
Step 9: Deploy your token on testnet
For deploying our contract will will create a deployment script deploy_erc20.js that we will put in the scripts folder with the following code:
async function main() {
  const MyToken = await ethers.getContractFactory("Token")
  // Start deployment, returning a promise that resolves to a contract object
  const my_token = await MyToken.deploy()
  console.log(my_token)
  console.log("Contract deployed to address:", my_token.target)
}
main()
  .then(() => process.exit(0))
  .catch((error) => {
    console.error(error)
    process.exit(1)
  })
Then we will this command to run this code
npx hardhat run --network neox-t4 scripts/deploy_erc20.js
And you should see an output similar to this
Contract deployed to address: 0x94Be4bc282Cb35945763cA060dd4C6c1A2Fb07f7
It means your contract have been deployed and you should be able to find It on the explorer by changing the hash by the one of your deployment.
Step 10: Verify your contract
If you followed this tutorial you already know It's super simple to verify your contract. You just need to run this command by changing the hash by the one you got in Step 5:
npx hardhat verify --network neox-t4 0x94Be4bc282Cb35945763cA060dd4C6c1A2Fb07f7
Then you should see an output similar to this showing the verification was successful
Successfully submitted source code for contract
contracts/Token.sol:Token at 0x94Be4bc282Cb35945763cA060dd4C6c1A2Fb07f7
for verification on the block explorer. Waiting for verification result...

Successfully verified contract Token on the block explorer.
https://neoxt4scan.ngd.network/address/0x94Be4bc282Cb35945763cA060dd4C6c1A2Fb07f7#code
Step 11: Interact with your token
We already saw in the verify tutorial how to interact with our contract and on the Hello World tutorial how to interact with our contract using a script. But let's write a new script to have a new example.
We will add a file named get_balance.js with the following code in the scripts
async function main() {
    const contractAddress = "0x94Be4bc282Cb35945763cA060dd4C6c1A2Fb07f7";
    const address = "0x2614D8Fc06dcd0B073d889A498546FF464193551"
    const TokenContract = await hre.ethers.getContractAt("Token", contractAddress);

    let balance = await TokenContract.balanceOf(address);
    console.log(`${address} has a balance of ${hre.ethers.formatUnits(balance, 18)}`);
}

main()
    .then(() => process.exit(0))
    .catch((error) => {
        console.error(error);
        process.exit(1);
    });
For using this script just replace contractAddress by the hash you got at Step 5 and address by the address you want to retrieve the balance and run this command
npx hardhat run --network neox-t4 scripts/get_balance.js
You should see an output like this one
0x2614D8Fc06dcd0B073d889A498546FF464193551 has a balance of 100000000.0
Now you can replace balanceOf call by any other function of the ERC-20 and use a similar script to retrieve the information you need. For example if you want to send some of your token you can use a script like this one to send 100 \$TOK to receiverAddress:
async function main() {
    const contractAddress = "0x94Be4bc282Cb35945763cA060dd4C6c1A2Fb07f7";
    const receiverAddress = "0x762daCF582172E69662613A035C8D73Fa2720755";
    const amount = BigInt(100 * (10 ** 18), 18);
    const TokenContract = await hre.ethers.getContractAt("Token", contractAddress);

    let tx = await TokenContract.transfer(receiverAddress, amount);
    await tx.wait()
    console.log(`${hre.ethers.formatUnits(amount, 18)} $TOK have been sent to ${receiverAddress} on transaction: ${tx.hash}`);
}

main()
    .then(() => process.exit(0))
    .catch((error) => {
        console.error(error);
        process.exit(1);
    });
Conclusion
Congratulations you successfully manage to create your own ERC-20 contract on NeoX testnet chain. To recap you learnt how to:
- Familiarize with OpenZeppelin package
- Write and compile your ERC-20 contract
- Deploy your ERC-20 contract
- Verify your ERC-20 contract
- Interact with your ERC-20 contract